
Removing the Nozzle Tips

To remove the nozzle tips when they are cold, do the following:

  1. Separate or remove the cavity plate from the hot runner. Refer to Removing and Installing the Cavity Plate for more information.
  2. Remove all nozzle heater components except for the nozzle heater and thermocouple. Refer to Removing and Installing Nozzle Heaters for more information.
    CAUTION:

    Mechanical hazard – risk of damage to the hot runner. Solidified resin can make it difficult to loosen the nozzle tips. Too much force when loosening the nozzle tips could damage the sealing surfaces or damage (stretch or break) the valve stems.

    If the nozzle tips do not loosen easily, heat up the nozzle tips before removing them. Refer to Removing the Nozzle Tips when Hot for more information.

  3. Using an appropriate nozzle tip socket, loosen each nozzle tip that will be removed. Do not unscrew or remove the nozzle tips.

    Refer to Special Tools. for a list of available nozzle tip sockets.

  4. Remove the nozzle tips using the nozzle tip socket.
    Figure 1. Removing a Nozzle Tip
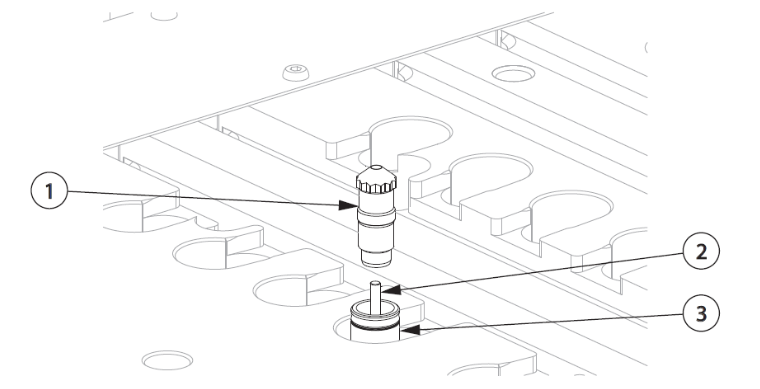
    1. Nozzle Tip

    2. Valve Stem

    3. Nozzle Housing

  5. Remove the nozzle heaters. Refer to Removing and Installing Nozzle Heaters for more information.
    Important:

    Care must be taken to prevent damage to the nozzle tip and nozzle sealing surfaces.

  6. Remove any resin from the interior of the nozzle tip using a soft wire brush or equivalent.
  7. Remove any resin from the interior and exterior of the nozzle housing using a soft wire brush or equivalent.
    Note:

    Do not remove locks and tags until the nozzle tips are installed.

Back to Ultra Valve Gate Hot Runner Maintenance